Receivers
The Communicator is one of the most important services in ATraqII. It is the engine that controls all of the incomng and the system generated signals. There are many fields that need to be set before you can actually receive any signal. It is fully recommended that all of the Administrator>Settings be completed before we continue with the Communicator settings. There are areas in the Communicator where you will be required to go and make minor adjustments in Settings especially in Signal Types. If you need to open multiple screens you can always right click the link and open in new tab. It tends to be easier that way.
One important thing to note is that each Communicator is counted as a seat. As it is continuosly running it needs to be assigned as a seat. So when you license the system, don't forget that you have to have that one seat assigned to the Communicator when calculating how many seats are needed. Each Communicator (not receiver) is counted as one seat.
Main screen
Let's take a look at the receivers screen and aquainted with the service.
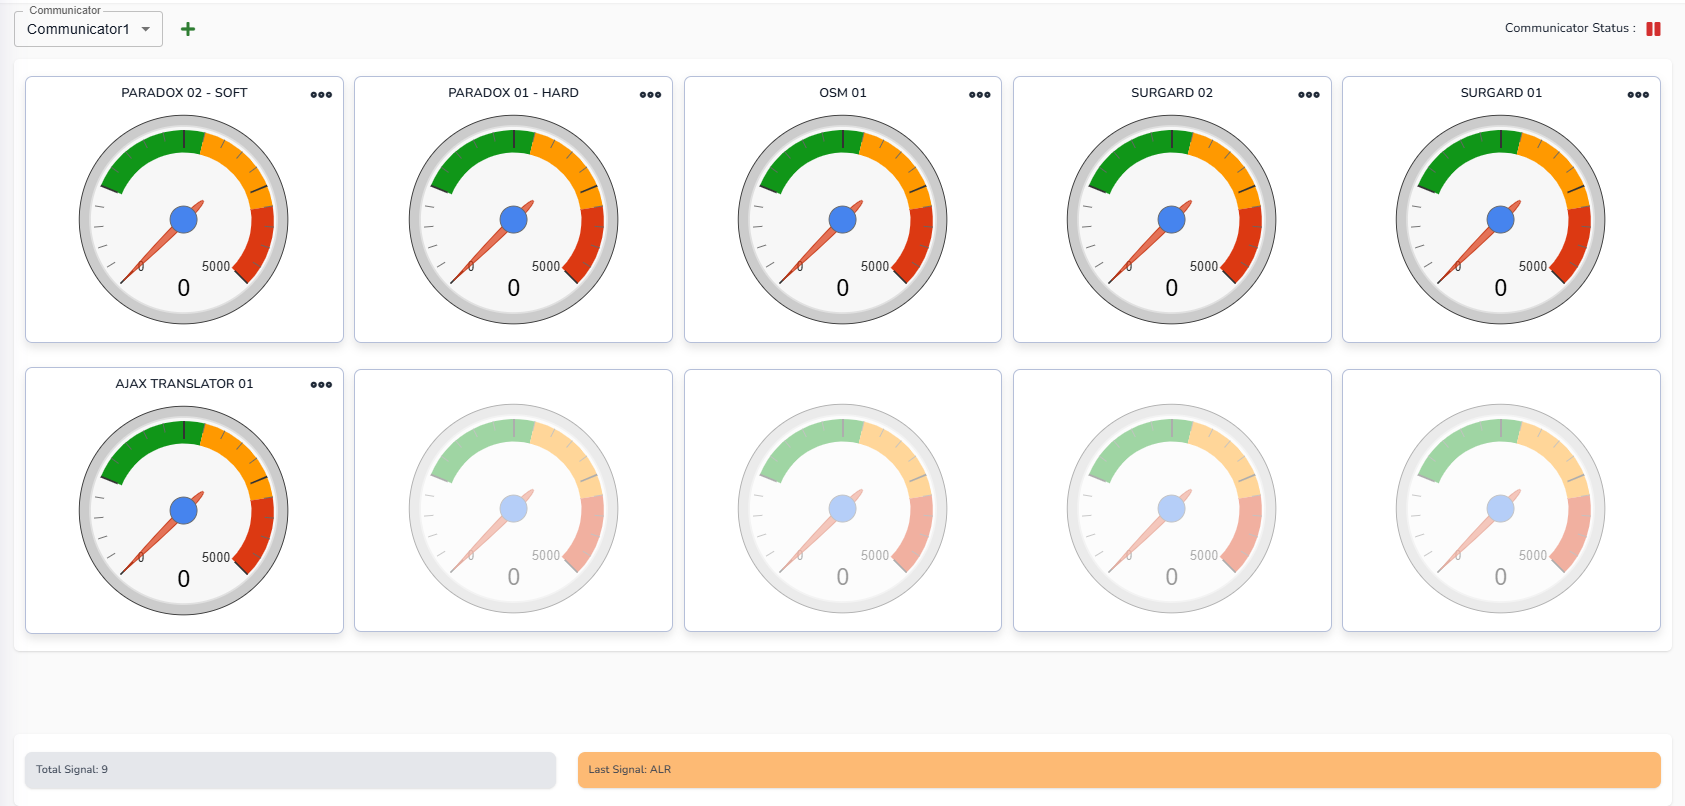
One major difference from the ATraq Desktop is that now there are 10 receivers per Communicator. In the desktop version, we had the Communicator working on different servers and they needed to maintained by accessing each server individually.
With the new CommunicatorTwo, we now have one screen where we can manage all of the Communicators from the one screen. Each Communicator is stored on a seperate Docker[1] image and can be stored on any server or VM. If you have a high capacity hardware then you could also have multiple Communicator images on the one server. The Master Communicator, the service that checks the database and creates automated signals (for example, Late closing. There is no signal that is actually received for this.), is also on another Docker image. So the Receivers screen is just for incoming signals management.
You can choose the other Communicators through the top left pull down menu. The system will automatically add a new Communicator once this screen is full and you want to add another receiver. It will give you a warning that it will use up one more seat so you can be prepared for it. Once you add the 11th receiver, the system will take a few minutes in creating the new Docker image into Docker
To add a receiver all you need to do is click on the plus sign in the top right corner. The following modal pops-up:
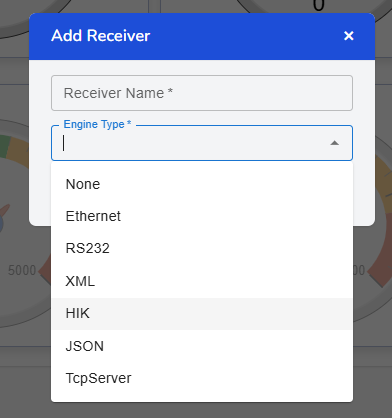
All you initially have to do is add the name of the receiver and the type of communication it has with the receiver. The types of receivers are organised into the following categories:
- Ethernet: This type of receiver is the most commonly used hardware receivers like Sur-gard[2] System III. It is generally the type used with soft receivers. Some companies have update their older receivers by using RS232-Ethernet converters. You need to use this for these types of receivers as well.
- RS232: This is the more older type of receivers that connect through RS232 ports. For this to function properly you need to have a port that is virtualised and accessable from the Docker Container. Our team can help with setting this up.
- XML: There are a few soft receivers that communicate through XML format. One of these is the OSM soft receiver by EBS[3] (now Alarm.com[4])
- HIK: This is a specialised protocol for the HikVision soft receiver
- JSON: This is the JSON protocol for many new receivers coming out. Although it's not common, there are receivers that are sending all of the programmed zone details, users and other details from the panel to ATraqII without the operator or remote technician re-entering details.
- TcpServer: This is when the Communicator is actually acting like a receiver for panels receiving signals directly. The most common TcpServer is the SIA DC09. So if you have a panel that communicates via DC09, this is yur communication protocol.
- None: This is if the there is a system has direct connection to the database without going through the Communicator. For example, from the previous ATraq Desktop Communicator. But it needs to be monitored with the Master Communicator to create the automated signals.
Once you fill in the fields and click on save you can see the next modal with the details of the receiver. It looks like this:
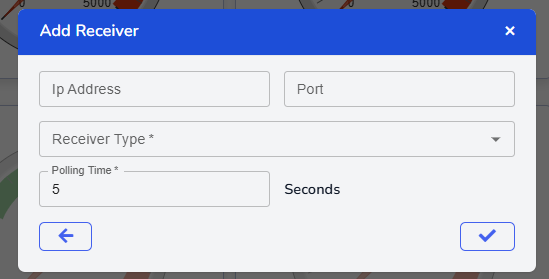
In this example we picked the Ethernet receiver. So it asks for data accordingly. Just enter the IP address and port of the receiver.
You don't necessarily have to have the receiver in the same premises. The IP and port could be on a remote side with a public IP or through a VPN. Try not to have the receiver work over port 80. This is great it you want to show your customers that you have a local sub-station where their panels communicate in their own state to the receiver and the receiver sends the data to your central ARC.
Next choose the receiver brand. We have filtered the receivers to their communication technology so you don't have to choose from a larger list.
Last but not least choose the polling time. The receiver should be sending a heartbeat signal at certain intervals. If we don't receive anything for the mentioned polling time, the Master service will create a notification accordingly.
If you do not want to have polling time checked by the system, set polling time to 0.
Receiver details
When you click on the three dots of the receiver you will see another sub-menu. They look like something like this:
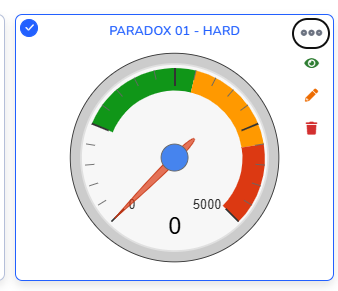
When you click on the first icon, you will see the signals of that receiver for the past 1 month. You can filter it for specific signal types and line cards. This is a good window to view see the
When you click on the second icon, you will be able to edit the receiver settings. make sure to click on save after you update.
And the last icon is the delete button to delete the receiver.
If we want to stop the Communicator for what ever reason (this generally is used if we want to change the location of the Docker image of the Communicator and don't want to loose the signals as when stoping the Communicator, the receivers will be caching their received signals), then click on the pause button in the top right corner.
In the lower section of the window, you can see the number of signals received that day. The counter resets at 00:00 every day. On the right side, you will see the details of the last signal received. This will automatically update.
[1] Docker is a registered trade mark of Docker Inc. USA.
[2] Sur-gard is a registered trade mark of Tyco Security Products
[3] EBS is a registered trademark of EBS Sp. Z O.O.
[4] Alarm.com is a registered trademark of Alarm.com Incorporated